Posted on

Verifying Calibration

Once you have calibrated your peripherals, first in Windows, then in X-Plane, you want to check that they are functioning correctly. The obvious way is to start X-Plane and move the controls. But a more precise way is to check the Data Output values.

Go to SETTINGS –> Data Output

Click the first checkbox next to option 8, the actual values that the joystick/yoke passes to X-Plane are then displayed in the upper left corner of the screen:

Click the first checkbox next to option 26, the actual values that the throttle passes to X-Plane are then displayed in the upper left corner of the screen:

image.jpeg

Now move the peripheral to its extents and observe the displayed numbers between 0.000 (minimum) and 1.000 (maximum).

If you cannot attain numbers very close to 0.000 (minimum) and 1.000 (maximum), recalibrate again (first Windows calibration then X-Plane calibration)

Once you have verified that the extreme values are OK, then this precise data output also helps you to adjust the sensitivity curve more precisely than just eyeballing the graph.


See also: Control Sensitivity Vs Axis Response Curves

Posted on

The best way to diagnose X-Plane problems – particularly calibration issues is to look at the datarefs.
There are two ways to do this – Using the built-in dataref display or using a freeware plugin called DataRefTool

For example, we often need to check the actions of the parking brake:

You can set a dataref display to show in the screen by clicking Settings –> Data Output and selecting Gear and Brakes:

image.jpeg

The display will look like this:

image.jpeg

Alternatively, use the Dataref plugin which shows more information and is much easier to read:

image.jpeg

To get the Dataref tool go to the DataRefTool web site and download it. The documentation is on the site. This tool is particularly useful for seeing how often the dataref changes by colour-coding the display.

The Dataref tool was created by Lee C Baker is works with X-Plane 11 and X-Plane 12

Once you have finished tinkering, make sure to completely disable the dataref tool plugin before actually flying.

Posted on

Record your Framerate

It’s all very well to to watch “f-act” in the screen frame-rate display as you fly. However it’s constantly changing. The best way to study your frame rate is to have a list of all these figures and maybe put them into a spreadsheet. You can easily do this by clicking on the Developer menu pull-down option and click on Show FPS Test recorder.

Test recorder.jpg

In the window that pops up you can click “Start recording” at any point during your flight and when you have recorded enough, click Stop recording. X-Plane then writes out a file showing the stats:

Test recorder result.jpg

You can find this file in the …X-Plane 12\Output\replays folder as a .fps file. Although it has a .fps extension, its a text file readable in any text editor. It’s laid out as a CSV file [comma-separated values file]  with spaces instead of commas so it’s easy to import into a spreadsheet.

Of course, you can always set the data output to record to a file as well as show on the screen, but this is often overkill since the entire flight’s frame rate is recorded resulting in an enormous file:

Sisk recording.jpg
Posted on

Brakes, Chocks and Aircraft that refuse to Taxi

There have been a number of changes to the way brakes are applied and released.

  • If the brakes are released and the aircraft still won’t move, check the chocks in the ground handling menu.
  • The “V” key (maximum brake effort) works differently. You can no loner release brakes by using V as a toggle.
  • The “B” key works in some aircraft and not in others (try it in the Cirrus for example)
  • The “B” key has different strengths in different aircraft.
  • And of course the granddaddy of all handbrake confusion – check that your pedals are not set to “full brakes” when released. (To fix, swap the brake axis assignments by ticking or unticking the “Reverse axis” checkbox in the AXES section of the Joystick Settings menu).

And the BEST TIP OF ALL:

– Set the Data Output “Gear & brakes” (#14) to display on the screen. Then you can see what is working and at what strength (from 0.0 to 1.0).

The easiest way to see “whats going on” is to use the Data Output functionality and display “gear&brakes”, this will show you the ratio of brake application from 0.0 to 1.0.

Posted on

True Airspeed and Groundspeed Indicator

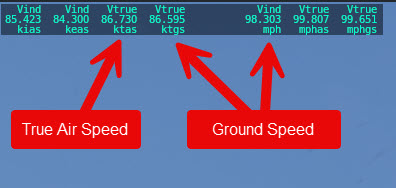
Did you know that hidden in the Speeds option of the data display, you get a table which not only shows your IAS [Indicated Air Speed] and TAS [True Air Speed], but also shows a GS [Ground Speed] indicator as well. Both in knots and mph.

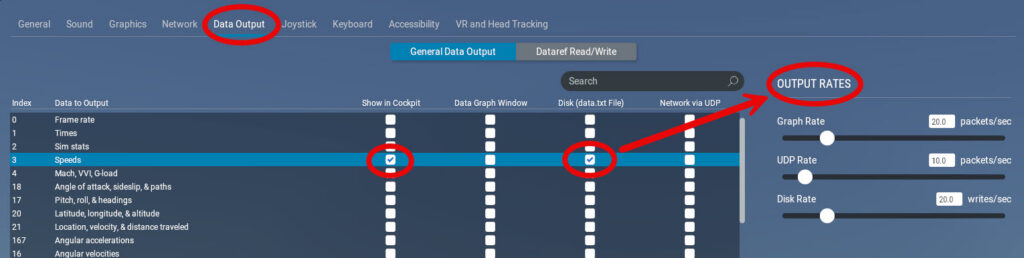
In the Settings –> Data Output screen, you can also click the Disk (data.txt file) checkbox and a series of speeds gets written to a txt file. You can even set the time increment between each recorded data point.

Here’s a link to a useful Wikipedia article explaining what airspeed actually is: