Posted on

Controlling Yaw

If your joystick or yoke is not able to control yaw, then you have a number of alternate strategies:

The best solution: Get a set of pedals.

Or: Allow X-Plane to simulate Yaw. X-Plane 12 automatically controls the rudder if it detects that the yaw is not assigned to a peripheral control. The problem with this is that it’s not very realistic, and the automatic rudder function cannot cope with gusty wind conditions, especially crosswinds.

There is a third alternative:
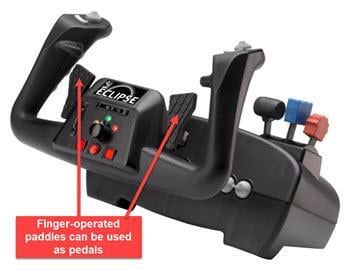
Some yokes have a set of hand-operated “paddles” (for example, the CH Products’ Eclipse Yoke), which can be used to control yaw with your fingers: 

CH Eclipse.jpg

And even a 4th Alternative:
If you don’t have pedals but you do have a second joystick, you could assign one of its axes to the Yaw control. This might be a little weird to fly with, but X-Plane doesn’t care. If you are into 3D modelling, you no doubt have a 3d mouse – one of its axes could also be assigned to Yaw.

Posted on

Taxi with a large aircraft

In large commercial aircraft, a nosewheel tiller is used to more accurately align the nosewheel to the taxi lines, and to get the aircraft safely docked at jetways.

You can assign an axis on your joystick to control this tiller by opening Settings –> Joystick and look for an axis that you have not assigned to anything. Every axis that X-Plane recognizes on your peripheral(s) will be listed In the AXES column. Once you have found an available axis assign it to nosewheel tiller. This will not interfere with the pedals axis or the yaw axis.

Note that this is the same procedure used in setting up the joystick axes normally, as described in the section “Configuring Flight Controls” in the X-Plane online manual.

The nosewheel tiller is used to make larger turn corrections when taxi-ing and the rudder pedals are used to make small inputs such as on takeoff roll and final alignment to your jetway.

Posted on

Spongey Taxi-ing with the Default Cessna C172

Have you ever cursed X-plane and swore that the simulator was not working realistically when making an initial take-off run in a Cessna C172? It seems to do all sorts of ridiculous weaving.
I am not referring to the well-known fact that it pulls to the left and is quite correctly modeled – the spiralling slipstream propwash effect – but it might surprise you that the spongey effect of steering/correction/over-correcting with the nose wildly swerving left and right is also quite realistic. Essentially the reason for this spongey effect is because the real cessna 172 does not have a direct mechanical link to the rudder, but uses a spring-loaded system.
This effect is actually correctly modeled in X-plane despite your screaming at your yoke in frustration!.

For an explanation of what is actually happening, have a look at this article from the Cessna Owner Organization. There you will finally get an explanation for what you might initially have thought is a bad flight model or a faulty peripheral controller.

The solution? Firm but gentle pressure avoiding sharp yoke and pedal movements.

Posted on

Joystick Profile Management

When you assign X-plane commands to joystick/yoke/throttle quadrants it is always a good idea to save the assignments to a new profile using the Manage Profiles button. You then associate that profile with one or more aircrafts. Each time you make a new set of assignments, save them to a different profile. That way, you can have a specific set of command assignments for every different aircraft that you fly.

Save joystick profile.jpg

Each profile will be saved as two files YourProfileName – Joysticks.prf and YourProfileName – Keys.prf in the … X-Plane 12\Output\preferences\control profiles folder.

If you decide to re-download a new virginal copy of X-plane, it’s the easy enough to simply copy the … X-Plane 12\Output\preferences\control profiles folder across to your new installation.
Of course, this folder should always be backed up as well to save you having re-do all your control preferences again.

Posted on

Honeycomb Bravo only partially works out of the box.

If you have just purchased a Honeycomb Bravo Throttle Quadrant, you will soon discover that while the X-Plane automatically detects this peripheral and allows you to configure most of it’s controls, the buttons. rotary switches, and annunciator lights don’t work, and the trim wheel is a nightmare. The next step that the new user usually does is to download and install the official honeycomb software on their website. Then the nightmare really begins in earnest because this is a truly horrible piece of software.
Instead of installing this official software monstrosity, skip installing it (or remove it from your computer entirely) and rather download and install this excellent freeware plugin from the X-Plane.org freeware repository. The plugin was developed by @ZodiacZ and publicized by @ELATES and works superbly and is really easy to setup. There are quite a few existing aircraft profiles available in the download for specific default and add-on aircraft. The plugin even works with the excellent skunkcrafts updater.
If you create a profile for a particular aircraft not in the already available profile list, you can contribute to making this plugin even better by submitting the profile that you create for everyone to use.

Posted on

Calibrating Joysticks doesn’t seem to work properly?

Most times, just calibrating your Joystick from the Settings –> Joystick menu in X-Plane works just fine.

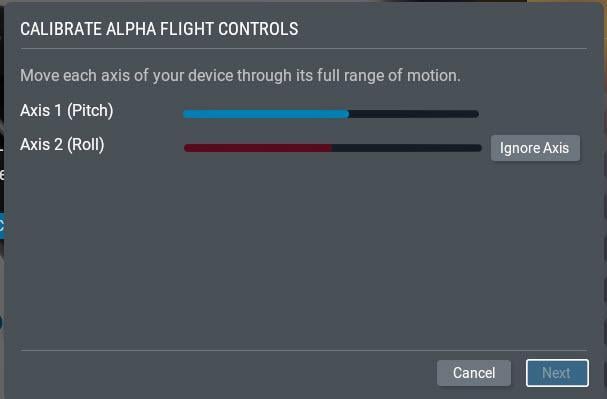
All you need to do is move the controls to their extents, and the ribbon turns blue. Then you click Next, and so on…

But sometimes, the ribbon stubbornly refuses to change to blue or turns blue before you have moved the axes to their full extent.

So what do you do? 

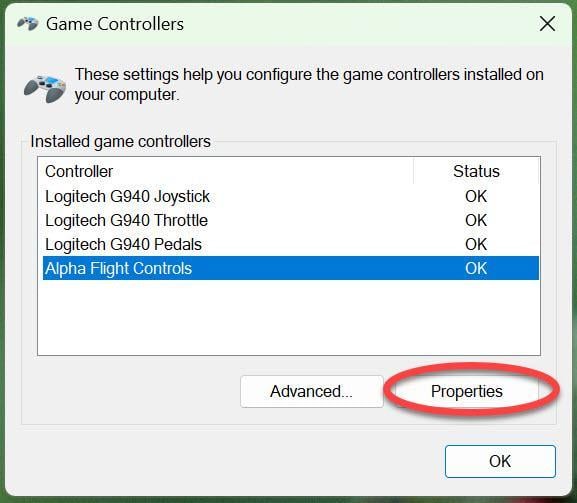
You first calibrate the joystick(s) in Windows first.

Type USB into the Windows search box and click image.jpeg

Then select the offending peripheral and click Properties:

image.jpeg

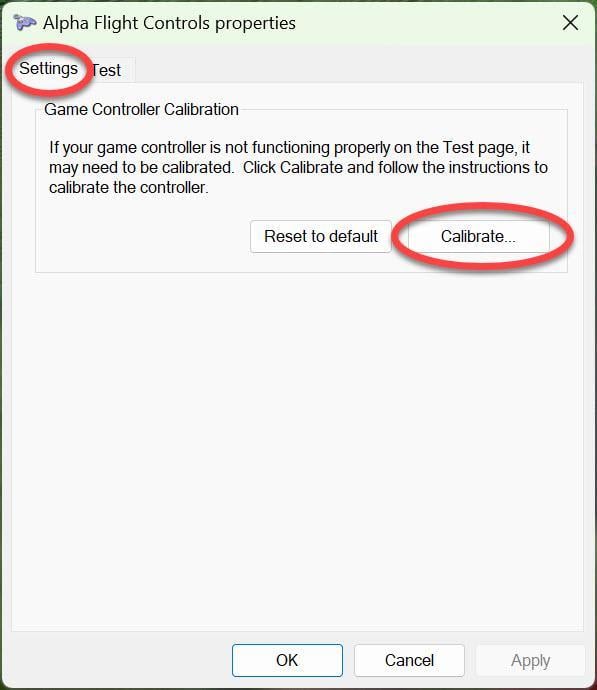
Then click the Settings tab and the Calibrate button:

image.jpeg

and go through the calibrate routine.

Then start X-Plane and at the main menu click the Settings option, and then select the Joystick  pull-down menu, select your peripheral :

image.jpeg

Click Calibrate and go through the standard X-Plane calibration routine:

image.jpeg
Posted on

A Mysterious White Square with a Cross

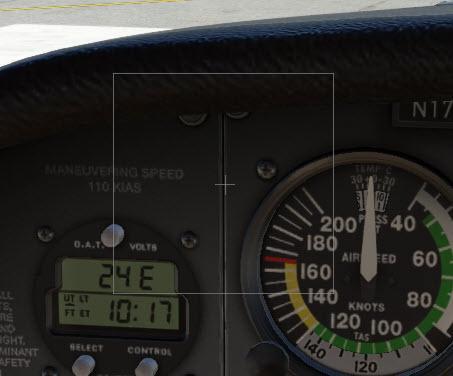
Ever seen this?

image.jpeg

Sometimes a strange white box appears with a cross in the middle. This is actually a mini-control panel for controlling X-Plane with a mouse. It pops up when your joystick/yoke is either missing or faulty.

Dragging the cross with the mouse operates the turn and pitch controls.

The square disappears when you connect a Joystick or Yoke, even when X-Plane is running.

If it appears sporadically, it’s usually a sign of a break in the mouse USB cable or plug.

Posted on

Verifying Calibration

Once you have calibrated your peripherals, first in Windows, then in X-Plane, you want to check that they are functioning correctly. The obvious way is to start X-Plane and move the controls. But a more precise way is to check the Data Output values.

Go to SETTINGS –> Data Output

Click the first checkbox next to option 8, the actual values that the joystick/yoke passes to X-Plane are then displayed in the upper left corner of the screen:

Click the first checkbox next to option 26, the actual values that the throttle passes to X-Plane are then displayed in the upper left corner of the screen:

image.jpeg

Now move the peripheral to its extents and observe the displayed numbers between 0.000 (minimum) and 1.000 (maximum).

If you cannot attain numbers very close to 0.000 (minimum) and 1.000 (maximum), recalibrate again (first Windows calibration then X-Plane calibration)

Once you have verified that the extreme values are OK, then this precise data output also helps you to adjust the sensitivity curve more precisely than just eyeballing the graph.

See also: Control Sensitivity Vs Axis Response Curves

Posted on

USB-2 vs USB-3…

This tip is undoubtedly well known to X-Plane users who upgraded their computer hardware fifteen years ago, but perhaps it is not so well known today.

While USB-3 ports are supposed to be totally backwards compatible, in practice, this is not always so. 

If you have an older USB joystick, set of pedals, or other peripheral device that was originally built to use a USB 2 port, avoid plugging it into a USB-3 (blue or red) port unless you have no option. Instead, for best reliability, plug it into a USB-2 (black) port if there is one at the rear of the motherboard.

This tip is particularly important if you use several USB-2 devices (like the older Saitek Radio and instrument panels) connected to a USB hub. Make sure that the hub is designed for USB-2 devices and plugs into a USB-2 port.

Posted on

Control Sensitivity Vs Axis Response Curves

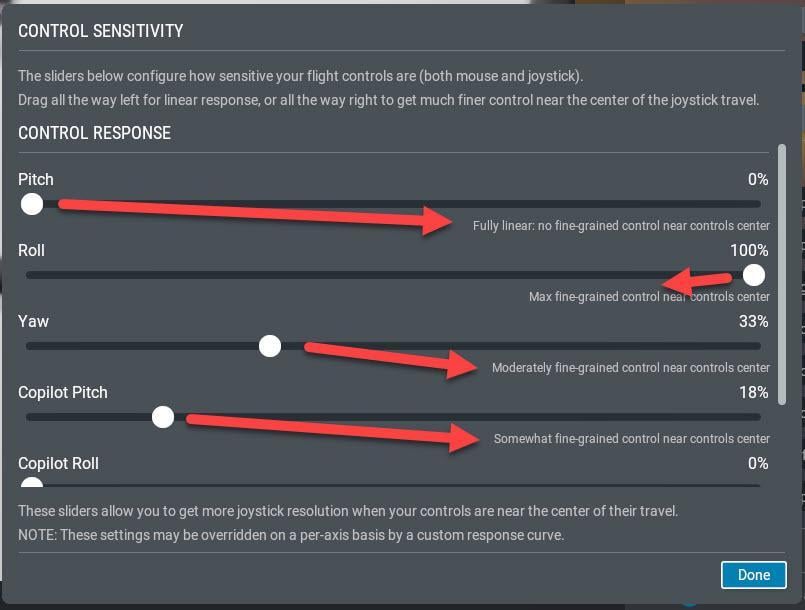
To adjust the sensitivity of a Joystick/Yoke, you use the CONTROL RESPONSE panel of sliders:

image.jpeg

This allows you to set an overall sensitivity for the pilot’s Pitch, Yaw and Roll axis as well as the Copilot’s Pitch, Yaw and Roll axis:

image.jpeg

The panel tells you the effect of moving the slider.

HOWEVER…

This is just a linear setting, and therefore, it is only of real use if your Yoke/Joystick is absolutely linear in performance. Very few are unless they are brand new with no wear and of very good quality.

A more useful tool is the response curve graph. But unfortunately, you cannot use the SENSITIVITY tool for rough adjustments and then fine-tune it with the RESPONSE CURVE. In X-Plane 12, it’s Either/Or. 

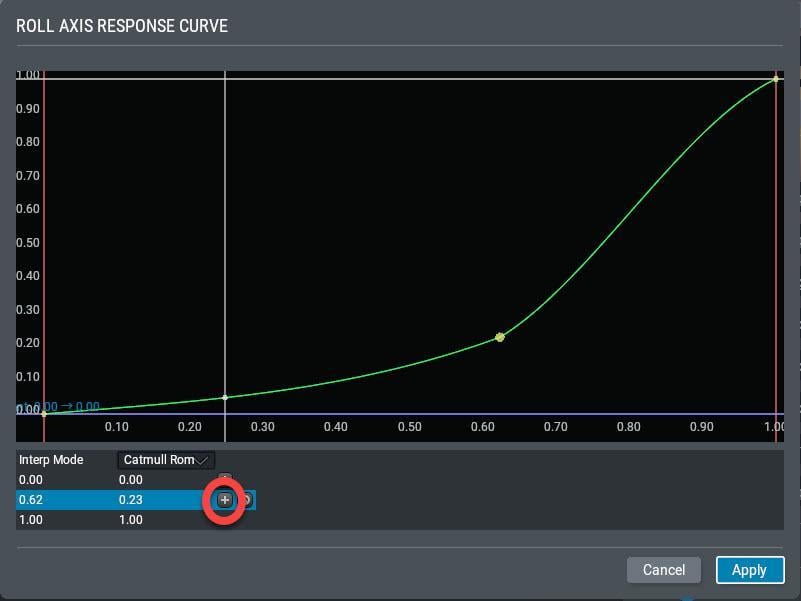
You get this graph by clicking the Add Response Curve button (ringed in the first image). Clicking this button produces this graph:

image.jpeg

There are no instructions in the X-Plane manual how to use this tool and I have to admit I wasted a lot of time trying to get this to work, until finally, I realized that you first have to select a point by clicking on the appropriate row in the table at the bottom. If you want to add another control point you have to click the “+” icon and another line is added. 

After you have figured this out, it’s easy but time-consuming to get the control points into their best position through trial and error.

Two Tips:

  • Don’t add more than two or three control points to the existing three. The fewer the control points, the easier it is to get the curve’s shape to match the characteristics of your peripheral.
     
  • It’s often a good idea to use an external view to see the actual physical movement of the control surfaces. You obviously can’t do this in real-time while you are updating the response curve, but you can quickly see the effect of your tweak while physically looking at the control surface from close-up. It’s then quick and painless to go back and forth into the settings menu from the top menu:image.jpeg