Posted on

Official X-Plane Documentation

The official documentation for X-Plane 12  is scattered around local locations and web locations.

Local:

In the main C:\X-Plane 12 folder there is a sub-folder Instructions. Inside that, there is an .html file containing the:
• X-Plane 12 off-line manual,
• Plane Maker manual and
• Airfoil Maker manual.
In addition there are .pdf files for the
Garmin G530,
G430,
G1000,
ATC Manual
as well as several other documents.

You will also find some documentation in some (not all) of the …\Aircraft\Laminar Research folders.

On-Line:

The on-line X-Plane 12 manual

Navigation & autopilot manuals

individual aircraft Pilot Operating Handbooks

X-Plane 12 blog

Facebook – X-Plane by Laminar Research

X-Plane 12 Customer Support and Bug Reporting

X-Plane 12 Release notes

X-Plane 12 Troubleshooting

X-Plane Developer Blog

X-Plane Developer – Aircraft Development Documentation

X-Plane Developer – Scenery Development Documentation

X-Plane Developer – X-Plane SDK Documentation

Posted on

Spongey Taxi-ing with the Default Cessna C172

Have you ever cursed X-plane and swore that the simulator was not working realistically when making an initial take-off run in a Cessna C172? It seems to do all sorts of ridiculous weaving.
I am not referring to the well-known fact that it pulls to the left and is quite correctly modeled – the spiralling slipstream propwash effect – but it might surprise you that the spongey effect of steering/correction/over-correcting with the nose wildly swerving left and right is also quite realistic. Essentially the reason for this spongey effect is because the real cessna 172 does not have a direct mechanical link to the rudder, but uses a spring-loaded system.
This effect is actually correctly modeled in X-plane despite your screaming at your yoke in frustration!.

For an explanation of what is actually happening, have a look at this article from the Cessna Owner Organization. There you will finally get an explanation for what you might initially have thought is a bad flight model or a faulty peripheral controller.

The solution? Firm but gentle pressure avoiding sharp yoke and pedal movements.

Posted on

Some Bullet-form Tips for Using X-Plane 12

Stability

  • Disable Unnecessary Plugins. Unused or incompatible plugins can tank performance. This is the #1 Stability tip of all time. Don’t just disable them; remove them from the directory hierarchy.
  • Optimize, but do not overclock your CPU or your graphics card
  • Cool your motherboard, RAM, and M2 SSDs. More than passive chassis fan cooling is required.
  • Use a UPS [UN-interruptible Power Supply] and an over-specced PSU [Power Supply Unit]

Graphics Optimization

  • Tweak Render Settings. Lower the visual effects (e.g., shadows, reflections, and antialiasing) if performance lags. Balance quality and frame rate for your hardware.
  • Try FSR (FidelityFX Super Resolution). X-Plane 12 supports AMD FSR, which can boost performance without significant visual loss.
  • Monitor VRAM Usage: High texture settings can overload your VRAM. Use the “Texture Quality” slider to optimize.

Aircraft Handling

  • Calibrate Controllers. Properly calibrate yokes, pedals, and throttle quadrants in the settings menu to ensure smooth aircraft control.
  • Adjust Control Sensitivity. Use the sensitivity sliders to fine-tune aircraft response, especially if it feels too twitchy.
  • Study the Flight Model Adjustment. X-Plane’s physics engine is advanced – experiment with “Flight Model per Frame” in the settings if you encounter unrealistic behaviour.

Weather System

  • Real Weather Accuracy. Ensure you’re connected to the internet for real-time weather updates. If the weather seems incorrect, force a refresh in the settings.
  • Adjust Turbulence Sensitivity. The new weather system is more dynamic. If turbulence feels overdone, tweak the realism sliders.

Customizing Views

  • Save Custom Camera Angles. Use the [Ctrl] + [number keys] to save cockpit or external views and quickly recall them with the corresponding number key.
  • Use Free Camera Mode. [c] or [Shift] + [4] activates free camera mode, great for screenshots or inspecting scenery.

Multiplayer and ATC

  • Use Default ATC. While not perfect, X-Plane 12’s ATC has improved tremendously over the past year. The latest update, 12.1.3 (about to be released – Time of writing: Late November), contains a huge ATC system update.
  • If you feel more confident, join online networks like VATSIM, IVAO, or PilotEdge for realistic ATC and multiplayer flying.

Posted on

Where NOT to install X-Plane on a Windows system

On a windows system there are certain folders which are user-write-protected. One of which is C:\Program Files which at first glance would seem to be the logical place. If you install X-plane in this folder, however, you will get all sorts of troubles, because you (or an addon-on) may not write to it.
Another bad idea is locating the X-Plane folder as a sub-folder of the special Documents folder – this results in all sorts of confusion with Microsoft OneDrive.
Make it a habit to create the X-Plane 12 folder in a first level sub-directory of the root. In other words, the ideal place for the X-Plane Folder is simply C:\X-Plane 12.
Alternatively anywhere on a secondary drive if you have one installed.

On a different but related topic, in 2025 you should not be installing X-Plane on a mechanical hard drive. The data delivery throughput is just too slow for a CPU or Graphics card capable of running X-Plane 12. Ideally, install X-Plane the fastest M.2 SSD you can afford, or at minimum on a SATA SSD. Hybrid SSHD drives (Mechanical hard drives with an SSD cache) also don’t cut it these days.

Posted on

X-Plane crashing after a few minutes – an unexpected solution

A few weeks ago I was faced with a PC which continually crashed when running an absolutely virginal installation. By virginal, I mean complete fresh download of X-Plane, with no plugins or addon’s of any kind installed.

Every test I performed on Windows showed no fault. Not even stress tests. Other programs worked without problems, but not X-Plane 11. The hardware was not brand new – but still pretty much state-of-the-art , but this was the first time it was used on a dedicated X-Plane machine.

X-Plane stubbornly crashed ( or better said, it froze) after a few minutes. 
I was tearing my hair out!

Then, just by chance, I touched one of the RAM modules. It was HOT. The module was fitted with a nice heatsink—it wasn’t just a board with exposed chips. But still… it was hot—too hot.

I got one of those clip-on RAM module coolers (They are cheap at Amazon)   :

image.jpeg

and I added another chassis fan which was pointed straight towards the RAM modules.

Result? No more X-Plane crashing.

Moral of the story:

The CPU, GPU, and motherboard might be adequately cooled, but don’t forget to check the temperature of the RAM modules, particularly if you are using one of the XMP modes.

Posted on

A Mysterious White Square with a Cross

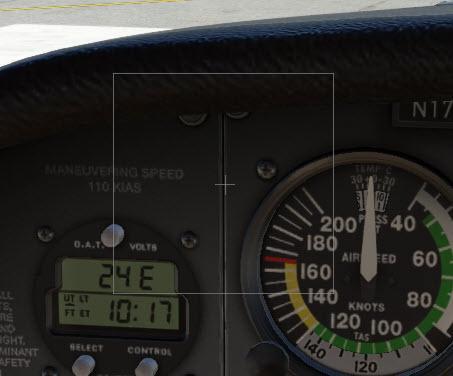
Ever seen this?

image.jpeg

Sometimes a strange white box appears with a cross in the middle. This is actually a mini-control panel for controlling X-Plane with a mouse. It pops up when your joystick/yoke is either missing or faulty.

Dragging the cross with the mouse operates the turn and pitch controls.

The square disappears when you connect a Joystick or Yoke, even when X-Plane is running.

If it appears sporadically, it’s usually a sign of a break in the mouse USB cable or plug.

Posted on

USB-2 vs USB-3…

This tip is undoubtedly well known to X-Plane users who upgraded their computer hardware fifteen years ago, but perhaps it is not so well known today.

While USB-3 ports are supposed to be totally backwards compatible, in practice, this is not always so. 

If you have an older USB joystick, set of pedals, or other peripheral device that was originally built to use a USB 2 port, avoid plugging it into a USB-3 (blue or red) port unless you have no option. Instead, for best reliability, plug it into a USB-2 (black) port if there is one at the rear of the motherboard.

This tip is particularly important if you use several USB-2 devices (like the older Saitek Radio and instrument panels) connected to a USB hub. Make sure that the hub is designed for USB-2 devices and plugs into a USB-2 port.

Posted on

Lost ATC window

Sometimes when the ENTER key is pressed to bring up the ATC window, it does not appear. It seems to be off screen. This frequently happens after a multi-monitor reconfiguration, resolution change, or display layout tweak.
The easiest way to force it back to the primary display is to clear or reset the stored window position preferences.
X-Plane saves dialog and popup coordinates in specific preference files. Deleting or renaming them forces X-Plane to recreate them with default, on-screen coordinates without wiping out your aircraft or controller profiles.

Quit X-Plane 12 completely.

Open File Explorer and navigate to your X-Plane 12 folder. (For example : C:\X-Plane 12)

Click the Output sub-folder, then open preferences (…\X-Plane 12\Output\preferences). Locate the following files (you’ll see one or both):

X-Plane Window Positions.prf
X-Plane Screen Res.prf

Rename them to

X-Plane Window Positions.prf.bak
X-Plane Screen Res.prf.bak

or simply move them to your desktop as a backup.

Restart X-Plane 12 and fresh preference files will be generated, pulling the ATC window to it’s default default position on the main screen.