Posted on

How to move the aircraft from one position to another without flying there

Remember the old Microsoft FSX term “Slew”? How do you do that in X-Plane without using a dedicated plugin?

Pause your flight.

Call up the map [M] or use the IOS [Instructor Operating Station]:

Click on the aircraft  icon labelled “You” and it turns yellow:

image.jpeg

Drag the yellow icon where you want it, or fill in the Latitude and Longitude co-ordinates and the Altitude.

The map only shows one scenery tile. If you want to drag the icon to a position off the map, move it a little past the edge of the tile, release the mouse and after a second or two the new tile will load with the icon in the middle of the map.

Close the map and un-pause. If you are in flight, expect the aircraft to jump and dive or roll, but you can easily pull out of the dive if you have enough height. If you are on the ground it is straightforward to move to another part of the airport, but if you are thinking about longer distances, be careful not to drag into a mountain or X-Plane will crash. If such a danger exists, rather increase the altitude of the aircraft (while still paused in the map view), move the aircraft, and then adjust the altitude down again before un-pausing.

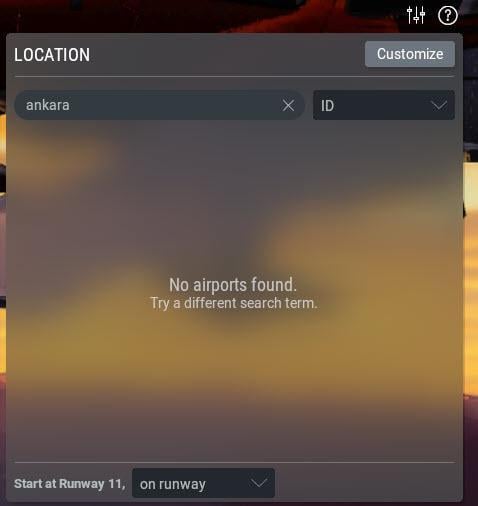
image.jpeg
Posted on

A comprehensive Electronic Flight Bag

A real-world EFB (Electronic Flight Bag) is usually an IPAD, Tablet or Laptop computer, containing flight documentation, charts, NOTAMs etc. Airline pilots refer to the EFB constantly because everything they need is in one place.

When simulating flight, we can have a similar idea, with the advantage that we can look at the stuff on a full-size monitor. 
Add-ons like AVITAB enable you to consult such documentation from withing the X-Plane cockpit. 

But when you want to plan and execute your flight, you don’t want to search the Internet for the relevant PDF files. By the time you have everything together, there’s no time left to fly.

My suggestion is to start assembling your own comprehensive Simulation EFB. 

Create a dedicated folder called EFB Briefcase, which has sub-folders containing:
• Documentation of all the aircraft in your hangar. The official repository is here
• Documentation on any add-on software that you use
• Scenery manuals – for simplified airport diagrams, etc
• Charts—every time you come across a chart when browsing, save it in the briefcase for use “one day”. You could also purchase a Navigraph subscription.
• Reviews – The information contained in these reviews can save you an enormous amount of time. Make a point of storing a PDF review or a link to a review on a major site like x-planereviews.com or x-plained.com
• A PDF copy of the offline X-plane manual and a link to the online version.

This Briefcase folder, which usually has many sub-folders, eventually contains everything that we might want to look up when running or configuring X-Plane, or simply as a handy repository to keep all our learning and reference stuff together.
It can be located on the X-Plane computer or, better yet, on a secondary computer, laptop, or tablet.

Not to forget

Your EFB Briefcase should of course contain all your Flying-Low e-books. Browse the whole collection here

Posted on

What if your Departure Airport is not listed?

When you choose your departure airport, you usually type in the city name or the airport name and X-Plane shows you a list of matches, and you select one of them.

However, sometimes X-Plane does not seem to know about an airport even though it should. For example, if you wanted to depart from Ankara, you would get a screen like this:

image.jpeg

But that’s crazy!… Ankara is a major city…

Go to Google or Bing and search for the ICAO code of Ankara

image.jpeg

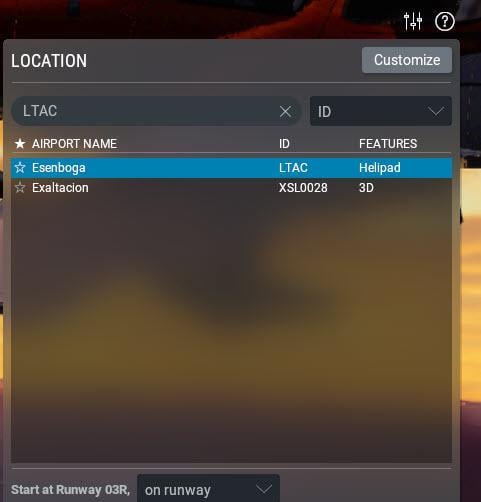
Now in X-Plane’s Location panel, instead of typing in of Ankara, type LTAC

image.jpeg

And this time, it comes up with the airport name Esenboga, which is Ankara’s main international airport. 

Posted on

Controlling Yaw

If your joystick or yoke is not able to control yaw, then you have a number of alternate strategies:

The best solution: Get a set of pedals.

Or: Allow X-Plane to simulate Yaw. X-Plane 12 automatically controls the rudder if it detects that the yaw is not assigned to a peripheral control. The problem with this is that it’s not very realistic, and the automatic rudder function cannot cope with gusty wind conditions, especially crosswinds.

There is a third alternative:
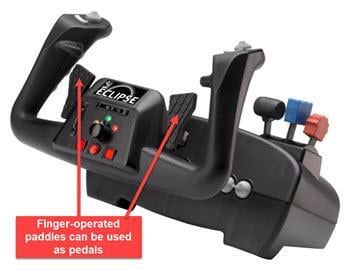
Some yokes have a set of hand-operated “paddles” (for example, the CH Products’ Eclipse Yoke), which can be used to control yaw with your fingers: 

CH Eclipse.jpg

And even a 4th Alternative:
If you don’t have pedals but you do have a second joystick, you could assign one of its axes to the Yaw control. This might be a little weird to fly with, but X-Plane doesn’t care. If you are into 3D modelling, you no doubt have a 3d mouse – one of its axes could also be assigned to Yaw.

Posted on

Screenshots and Better Screenshots

Most X-Plane users know that pressing SHIFT-Key-51x30.jpgSpacebar-30.jpg creates a screenshot which is stored in the …X-plane 12\Output\screenshots folder.

But there is a problem… You have to pause image.jpeg and then change the camera position. But by then you have probably already flown too far.

Here’s a neat trick – at any time during your flight, press image.jpeg to pause and then image.jpegimage.jpegto toggle the replay mode.

The replay scrubber appears : image.jpeg 

and you can now scrub the video to exactly the point in your flight that interests you, use the view controls to adjust the screenshot camera and take your shot.

Then simply toggle image.jpegimage.jpeg again to carry on flying where you left off.

Better screenshots

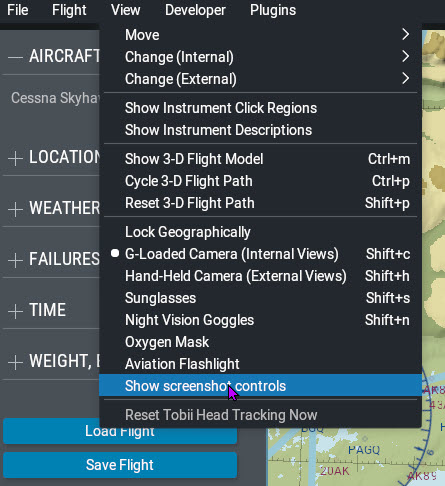
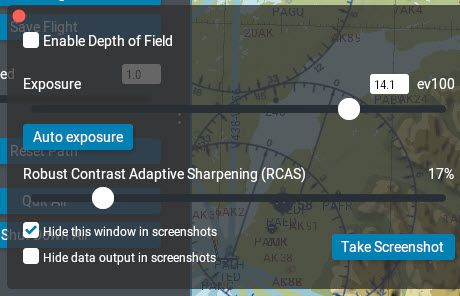
Click View –> Show screenshot controls and a window appears allowing you to adjust exposure, depth-of-field and sharpening.

Posted on

Scrubbing the flight path

Did you know that X-Plane can display your flight path? It does this by displaying a very thin purple line extending back from the aircraft to the point where you began your flight. 

image.jpeg

To make this flight path visible, first pause the flight image.jpeg, then apply the image.jpegimage.jpegcombination, and the flight track appears.

It get’s interesting, however, when you then enable replay mode image.jpegimage.jpeg. Now, you can scrub the timeline to move the aircraft to any position on this purple line. The line in front of the aircraft is not erased, so you can  inspect where you were, what your path was, and exactly how you flew from that scrubbed point onwards.

NOTE: “Scrubbing” is a term used in the video industry to refer to the ability to quickly navigate through a video by dragging a slider or timeline bar back and forth. Scrubbing allows you to quickly navigate through the replay and find the exact position of interest in the flight.

Sometimes, it is difficult to see this thin purple line, so pressing image.jpegimage.jpeg again creates a translucent “curtain” extending from the purple flight path track to the ground. Personally I find this “curtain” more confusing than the plain thin purple line.

Pressing image.jpegimage.jpeg a third time turns the flight path track off.

Posted on

Decimal Degrees vs Degrees Minutes Seconds

X-Plane uses Decimal Degrees in the map view. However, many charts, maps, and geographical descriptions use degrees, minutes, and seconds. When studying navigation and plotting courses, we often need to convert between the two.

Here are two on-line calculators:

Latitude & Longitude Degrees Minutes and Seconds – to – Decimal degrees

Latitude & Longitude Decimal degrees – to – Degrees Minutes and Seconds

Posted on

Aviation Glossary – Goldilocks Level

Aviation glossaries are usually either too complex and unwieldy or too short to be helpful. I came across a really good glossary which hits the sweet spot between the two.

@VSKYLABS is offering a free download of an aviation and aerodynamics glossary that every X-Plane pilot should have permanently on their desktop. It contains many terms which are absent in most professional pilot’s glossaries available online.

Here is a link

Posted on

The most useful view control of all

Here is a very basic tip that some X-Plane users use “instinctively” and thereafter find obvious, while others have never discovered it. An astonishing number of users have asked me if there isn’t a better, easier way to pan around than using keyboard shortcuts, assigning keystrokes to joystick buttons, or using an awkward “hat” switch.

The answer is, of course, yes.

Right-drag the mouse.

Simply hold the right mouse button down and move the mouse, and the whole view smoothly pans up/down/left or right, depending on where you drag the mouse. 

Posted on

X-Plane Phones home

If you intend to use X-Plane in an area with no internet access, always run X-Plane immediately before going offline. The download version of X-Plane regularly contacts its license server but will not be disabled for at least two weeks after the last internet contact. After about 2 weeks you may find that X-plane is temporarily locked until you once again regain an internet connection.

If you are likely to be offline for long periods, rather purchase the 12 DVD set – available here. This version does not “phone home”.