Posted on

The best way to diagnose X-Plane problems – particularly calibration issues is to look at the datarefs.
There are two ways to do this – Using the built-in dataref display or using a freeware plugin called DataRefTool

For example, we often need to check the actions of the parking brake:

You can set a dataref display to show in the screen by clicking Settings –> Data Output and selecting Gear and Brakes:

image.jpeg

The display will look like this:

image.jpeg

Alternatively, use the Dataref plugin which shows more information and is much easier to read:

image.jpeg

To get the Dataref tool go to the DataRefTool web site and download it. The documentation is on the site. This tool is particularly useful for seeing how often the dataref changes by colour-coding the display.

The Dataref tool was created by Lee C Baker is works with X-Plane 11 and X-Plane 12

Once you have finished tinkering, make sure to completely disable the dataref tool plugin before actually flying.

Posted on

Disabling Plugins

When ever X-plane starts running slowly/stutters/jerks or generally misbehaves, the first thing to do is to disable any unused/outdated plugins.
There are two ways to do this:

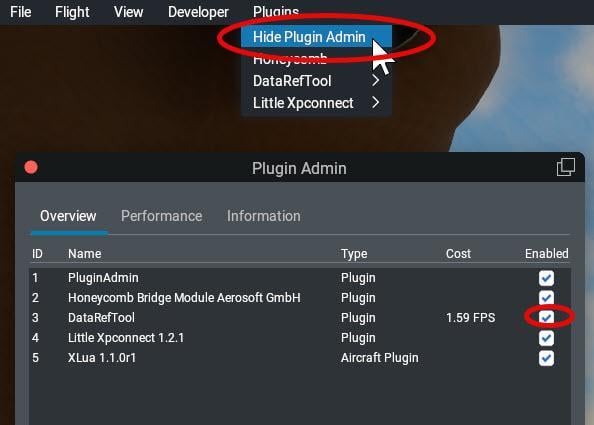
The first method is to go to the Plugins pull-down menu, and click the “Show Plugin Admin” option. This brings up a list of installed plugins and gives you an idea of how many resources they are consuming.

Disable plugin.jpg

Click the “Enabled” checkbox to enable or disable that plugin.

The second method is to completely remove all traces of that plugin by deleting the folder containing the plugin (individual plugin folders are found in the …X-Plane 12/Resources/plugins folder). If you don’t want to delete the plugin because you may want to activate it again, simply move the plugin’s folder to a location outside of the X-Plane 12 folder (like, for example, to the desktop).

Sometimes simply disabling the plugin using the Plugin Admin window is not enough as it still leaves the plugin in the plugin folder and – depending how the plugin is written – this may still have some residual effect. So to be sure that the plugin has no effect, delete or move it. To ensure that the plugin does not start gain the next time X-Plane is started, it needs to be deleted or moved out of the plugins folder.

Note: X-Plane does not use the Windows registry so simply moving the plugin elsewhere outside the X-Plane 12 hierarchy of folders without deleting it will remove its effect entirely.

See also What to do if X-Plane constantly crashes

Posted on

What to do if X-Plane constantly crashes.

I think these “commandments” should be permanently engraved for posterity.

Here are the verbatim instructions from @Janov on the X-Plane.org forum who has been forced to produce countless variations every few weeks or so.

On 6/28/2025 at 6:28 AM, Janov said:

This is a guideline on how to cure your X-Plane problems of crashing or device loss errors (DLE):

1.) Make sure your operating system is in prime shape. No overclocking. Latest drivers. Default graphic settings (no esoteric Nvidia settings, etc.), no paranoid anti-virus, no “I got this on a cool reddit forum with Windows tips” stuff.

2.) Remove all third party content from your X-Plane installation. Physically move them somewhere else, disabling them in X-Plane is not enough. This includes plugins, aircraft, scenery. If you are not sure you can do this reliably, just delete everything and install X-Plane fresh.

3.) Fly a default aircraft for a very long time. Let it go on autopilot if you don`t have the time, but fly a default aircraft in a default (“vanilla”) simulator setup until it crashes or you are sure that it is stable. The longer the better, I personally recommend to use it in this state for several long flights until you declare it stable.

4.) If the simulator crashed or you suffer a device loss error, file a bug with Laminar Research (google X-Plane bug reporter). Wait for LR to fix the problem. You can now post here and let us know about your problem, maybe someone can spot something wrong with your system that you missed.

5.) If you completed the long testing run with no problem, you can install your FIRST add-on. ONLY ONE! Repeat the long duration testing run. If XP crashes or has a DLE, you have found the offending third-party item. Do not use it anymore. Contact the developer of said item to fix it.

6.) Add your NEXT add-on. Repeat testing, discarding all add-ons that cause crashes or DLE´s.

Remember, there are no “must have” add-ons. There are only compatible or incompatible add-ons. It is the developer´s responsibility to make his add-on compatible or take it up with LR if the problem is not on his side.

Posted on

An Easy View of Historical Frame Rates

Here is a quick and easy way to see all the frame rates (or whatever data you are interested in) over a specified period of time.
In the Settings –> Data Output tab, click the check box in the Data Graph Window column: Data Graph window settings.jpg

Now begin your flight.
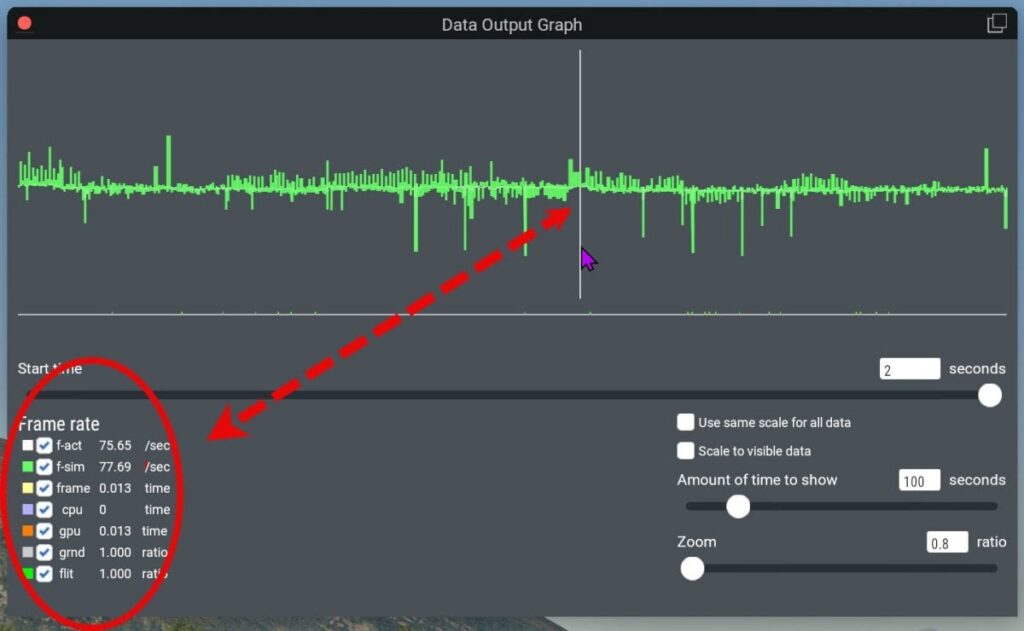
When you want to see the data, type [CTRL] G on Windows and Linux and [CMD] G on a Mac and a Data Output Graph window appears:

In this window you can adjust the time taken for the graph to travel from one side to the other side of the window. Now move the cursor above the green graph and a vertical white line appears at the cursor position and the precise frame rate (and related times) appears in the Frame rate list on the left. Once the graph reaches the right hand side of the screen (the specified “Amount of time to show”), The graph simply scrolls. Pressing pause [P] stops the simulation and the graph and will allow you to read the exact data value that appears below the vertical white line.
An added bonus is that the window can be moved to a second monitor where the graph can be enlarged and can be displayed while you fly without obscuring the main flying monitor.

Posted on

A Stuck Handbrake

This tip is actually 7 tips all parceled up in an anecdote. There have been many posts about a handbrake being stuck and refusing to disengage. Here’s a story that happened to me a few days ago. I was installing a brand new copy of X-Plane on a new machine. The latest released version – NOT a beta version. This was the most basic of installations – I simply downloaded the installer with a minimal amount of scenery. Once the installation had completed and the introductory tutorial had automatically started, I listened to Austin for a few moments and then skipped the rest of the introductory tutorial. I then shut down X-Plane and restarted it, fully expecting everything to work perfectly.

To my annoyance, when I began the first flight with the Cessna 172 Skyhawk, starting with all engines running, the handbrake would not release. There have been many posts about such weird behaviour so I began the usual search for the offending settings.

  • Tip 1 – The first and obvious thing was to press the [B] key or the [V] key while looking at the handbrake in the virtual cockpit. Nothing happened. Moving the mouse over the handbrake changed the icon to the hand symbol as expected, but clicking it had no effect.
  • Tip 2 – The next thing was simply to shut X-Plane down and restart it. Back in the cockpit, the handbrake was still stuck. At this point, I want to emphasize that this was an absolutely virginal download, with nothing extra installed and nothing configured at all.Next, I decided to shut X-Plane down and reboot the computer itself. No joy.I then tried shutting down again, but this time shutting the computer down completely [instead of just rebooting] and killing the power to the PC. After waiting 30 seconds or so for any stored charge in the machine to dissipate, I restarted the computer and restarted explain. Nope, the handbrake was still stuck.
  • Tip 3 – In the virtual cockpit, looking down at the pedals, I pressed each pedal down and watched the pedal image follow my physical movement. Pressing both pedals down and releasing will usually disengage the handbrake in X-Plane. Not this time. (By the way, on a first installation you sometimes need to reverse the pedal movement axis – you can see if this needs reversing by simply looking at the pedals in the virtual cockpit while depressing them) reverse axis.jpg
  • Tip 4 – The next step was to see whether a button on one of the controllers had been somehow bound to the handbrake. The usual shortcut to release the handbrake is the [B] key – break normally on, or the [V] key – break fully on – Parking brake. So I started looking for some control bound to one of those keys. No luck. Settings Joystick.jpgI checked every single button on the yoke and the throttle quadrant. Nothing was bound to [B] or [V]. I then repeated the process checking for every single switch. No luck.
  • Tip 5 – Next, I had a look at the key bindings themselves. In the Settings –> Keyboard section I selected the “Currently Assigned” filter and scrolled down to the basics section, looking for the two “toggle brakes” key bindings.
    key bindings.jpg
    They appeared to be correct [b and v].
  • Tip 6 – Next, I went to look again at the control buttons and switches, this time flipping each switch and clicking each button and checking on the joystick screen that the buttons were actually functional. No errors there.
  • Tip 7 – Now having checked all that I could think of to check, I started scratching my head. What what’s going on? The only thing that remained in my mind was that somewhere somehow some erroneous piece of data must have been stuck in some memory cache somewhere. So I decided to change aircrafts. I loaded up the C172 digital G1000 instead, and tried the handbrake again. It worked perfectly! I then shut X-Plane down, and restarted again with the original C172 analog skyhawk – and lo and behold, the handbrake worked correctly!  So this non-intuitive tip is a simple one. If all else fails, load a different aircraft. X-Plane should then load that aircraft’s settings instead. Then reload the original aircraft again.
Posted on

X-Plane Safe Mode

Did you know that X-Plane has a Safe Mode option?

If you hold down image.jpeg while clicking the X-Plane.exe start file, you get this screen (whether or not you crashed last flight):

image.jpeg

This safe mode allows you to start X-Plane using the Default rendering options rather than your carefully tweaked rendering options. If you click the “Use Default Rendering Options” button, X-Plane will load using the default graphics settings.
Because safe mode does not change your rendering settings, the next time X-Plane starts, it will use your custom settings again.

On purpose of this “safe mode” is to help get X-Plane started if an add-on that changes X-Plane’s visual graphics settings causes a crash.
The other purpose is to allow you to compare your customized setting experiments with the default values.

Note this does not have any effect on the graphics driver settings you may have customized. Safe mode only affects the values set in X-Plane’s Settings –> Graphics page

Posted on

Basic repairs – The preferences folder

To fix X-Plane problems, first remove all plugins that you might have installed in the Plugins folder. REMOVE them right out of the X-Plane file tree entirely, don’t just disable them. Move them to a different drive or to the desktop.

If that does not help, move the …\output\preferences folder out of the main X-Plane folder stack and place it on another drive or on the desktop. Unplug any USB controllers. Restart the computer.

The next time X-Plane is started, it will detect that no preference (.prf) files are present and rebuild them using X-Plane default values. Once X-Plane loads, immediately quit and shut the computer down.

Plug in the USB controllers again and start the computer.

You will have to re-calibrate any joysticks or yokes before flying.

See if your problem is solved. If not, check some of the other tips in the “Troubleshooting” section.

Posted on

Complete Graphics Driver Removal

If you run X-Plane on a Windows Operating System and you change your graphics card, you want to make sure that every trace of the drivers for the “old” card are completely removed from both your file system and the Windows registry. Before installing new drivers for the new card, just uninstalling the drivers manually using Control Panel will not sanitize your computer entirely. To make sure that your computer is “clean” before installing your new card, download a utility called DDU – Display Driver Uninstaller. It’s freeware from a company by the name of Wagnardsoft.
I tend to be very cautious about freeware windows cleanup tools, but this one is an industry standard with the apparent backing of both Nvidia and Intel.

The official Nvidia game drivers support site publishes this description of DDU:

Quote

Display Driver Uninstaller is a driver removal utility that can help you completely uninstall AMD/NVIDIA/INTEL graphics card drivers and packages from your system, trying to remove all leftovers (including registry keys, folders and files, driver store). The AMD/NVIDIA/INTEL video drivers can normally be uninstalled from the Windows Control panel, this driver uninstaller program was designed to be used in cases where the standard driver uninstall fails, or when you need to thoroughly delete NVIDIA and ATI video card drivers. The current effect after you use this driver removal tool will be similar as if its the first time you install a new driver just like a fresh, clean install of Windows. As with any tool of this kind, we recommend creating a new system restore point before using it, so that you can revert your system at any time if you run into problems.

To download the software, click here. Choose the portable version so that it doesn’t create even more registry entries.

To uninstall the “old” Graphics Driver from your system using the Display Driver Uninstaller (DDU) software, follow these instructions (produced by Intel): 

Quote

  1. Download the latest version of the software.
    • If you download the Installer, run it, it will create a shortcut on the desktop. 
    • If you download the Portable/ self-extracting version, look for the executable and extract it. Remember the path. 
  2. Reboot into Windows* safe mode. (Refer to Start your PC in safe mode in Windows.)
  3. Look for the shortcut on the desktop (step 1.1) or the extract path chosen (step 1.2.1) and run theDDU executable.
  4. Click Close in the Options window.
  5. Select device type to GPU and select device to the one you want to remove. If you are doing a clean-up, you can choose all GPUs.
  6. Click Clean and restart or Clean and Shutdown depending on your needs.
  7. Wait for the software to finish the process. It will automatically reboot Windows to the typical mode or shutdown the system.
Posted on

Multiple Log.txt files

Most people know that when X-Plane has a problem and you need help, the first thing you are asked for is the log.txt which is easily found in the main parent X-Plane folder.
But did you know that in the latest versions of X-Plane 12 there is another “buried” folder which contains the previous four log.txt files (time-stamped in the filename) as well as the last four ATC log files. This can be very useful in ascertaining whether a fault was random or consistent.

The Windows path to this folder is usually C:\X-Plane 12\Output\Log Archive

The MAC path to this folder is usually /Applications/X-Plane 12/Output/Log Archive

The Linux path to this folder is usually ~/X-Plane 12/Output/Log Archive

Posted on

Shader cache – the real story

With depressing regularity someone will suggest that deleting the shader cache is a cure-all for graphics anomalies and should be a regular part of X-Plane housekeeping.

The short answer is “No it isn’t” and “No it shouldn’t be”.
Don’t bother to delete the shader cache – it won’t fix anything

The long answer is buried in a long-buried discussion conducted over a year ago on X-Plane.org. Go to this link – it’s page 3 of a long thread about Public Beta 12.2.0-b4. Read the explanations (various posts) written by @JustSid (Sidney Just – Laminar’s graphics technical guru) – who is really the ultimate authority on this matter.