Posted on

Flight Models per Frame Setting

In the “General” tab of the Settings menu there is a strange-looking setting called FLIGHT MODEL:

Flight Model.jpg

This is usually left at the default setting for the default Laminar aircraft but some add-on aircraft may well require higher Flight Models per Frame setting particularly if it is a very fast combat aircraft, a very light glider or drone, or a very small aircraft like a Radio-controlled small scale aircraft being flown in a full-scale simulator like X-Plane.

Many X-Pane users have no idea what to do with this setting. However, buried in the X-Plane.org forums there was an interesting discussion about this with contributions from many of the most experienced X-Plane users. It’s well worth a read. You’ll find the thread here

The official manual also has a few things to say about Flight Models per Frame. Go to the on-line Desktop manual and in your browser search for “My Frame Rate is Low” and you’ll get to the right page.

Posted on

Calibrating Joysticks doesn’t seem to work properly?

Most times, just calibrating your Joystick from the Settings –> Joystick menu in X-Plane works just fine.

All you need to do is move the controls to their extents, and the ribbon turns blue. Then you click Next, and so on…

But sometimes, the ribbon stubbornly refuses to change to blue or turns blue before you have moved the axes to their full extent.

So what do you do? 

You first calibrate the joystick(s) in Windows first.

Type USB into the Windows search box and click image.jpeg

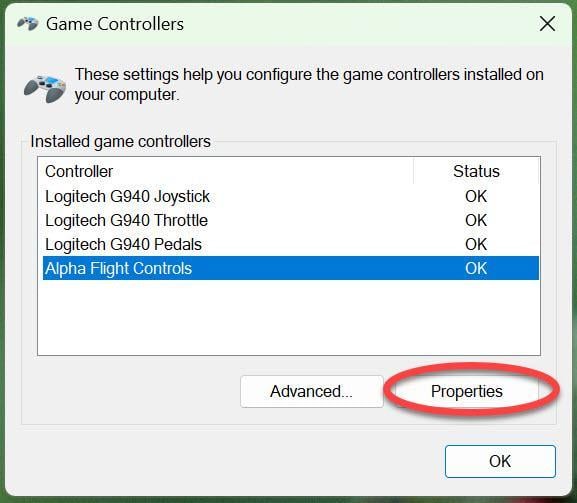
Then select the offending peripheral and click Properties:

image.jpeg

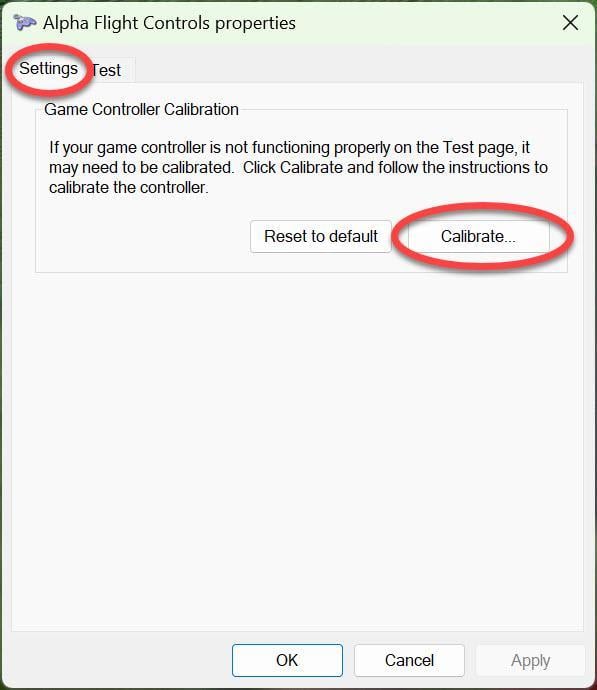
Then click the Settings tab and the Calibrate button:

image.jpeg

and go through the calibrate routine.

Then start X-Plane and at the main menu click the Settings option, and then select the Joystick  pull-down menu, select your peripheral :

image.jpeg

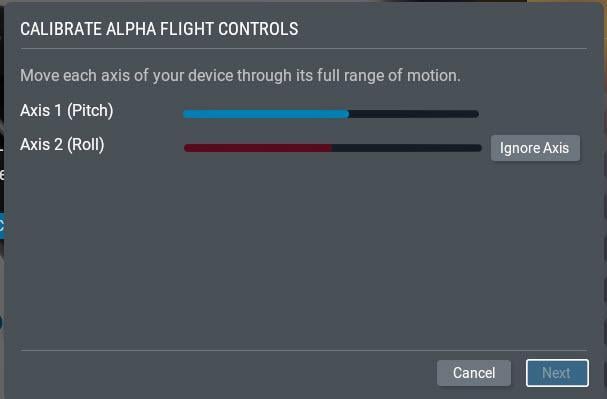
Click Calibrate and go through the standard X-Plane calibration routine:

image.jpeg
Posted on

Verifying Calibration

Once you have calibrated your peripherals, first in Windows, then in X-Plane, you want to check that they are functioning correctly. The obvious way is to start X-Plane and move the controls. But a more precise way is to check the Data Output values.

Go to SETTINGS –> Data Output

Click the first checkbox next to option 8, the actual values that the joystick/yoke passes to X-Plane are then displayed in the upper left corner of the screen:

Click the first checkbox next to option 26, the actual values that the throttle passes to X-Plane are then displayed in the upper left corner of the screen:

image.jpeg

Now move the peripheral to its extents and observe the displayed numbers between 0.000 (minimum) and 1.000 (maximum).

If you cannot attain numbers very close to 0.000 (minimum) and 1.000 (maximum), recalibrate again (first Windows calibration then X-Plane calibration)

Once you have verified that the extreme values are OK, then this precise data output also helps you to adjust the sensitivity curve more precisely than just eyeballing the graph.

See also: Control Sensitivity Vs Axis Response Curves

Posted on

Control Sensitivity Vs Axis Response Curves

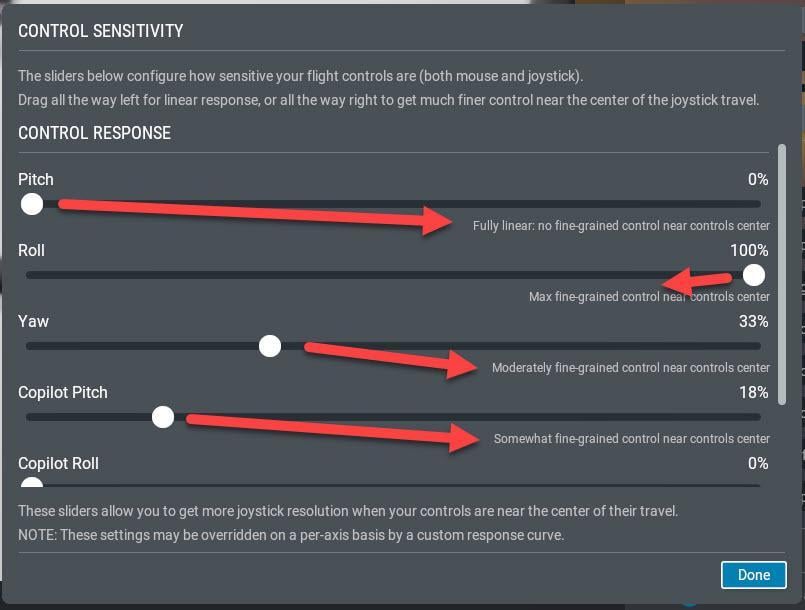
To adjust the sensitivity of a Joystick/Yoke, you use the CONTROL RESPONSE panel of sliders:

image.jpeg

This allows you to set an overall sensitivity for the pilot’s Pitch, Yaw and Roll axis as well as the Copilot’s Pitch, Yaw and Roll axis:

image.jpeg

The panel tells you the effect of moving the slider.

HOWEVER…

This is just a linear setting, and therefore, it is only of real use if your Yoke/Joystick is absolutely linear in performance. Very few are unless they are brand new with no wear and of very good quality.

A more useful tool is the response curve graph. But unfortunately, you cannot use the SENSITIVITY tool for rough adjustments and then fine-tune it with the RESPONSE CURVE. In X-Plane 12, it’s Either/Or. 

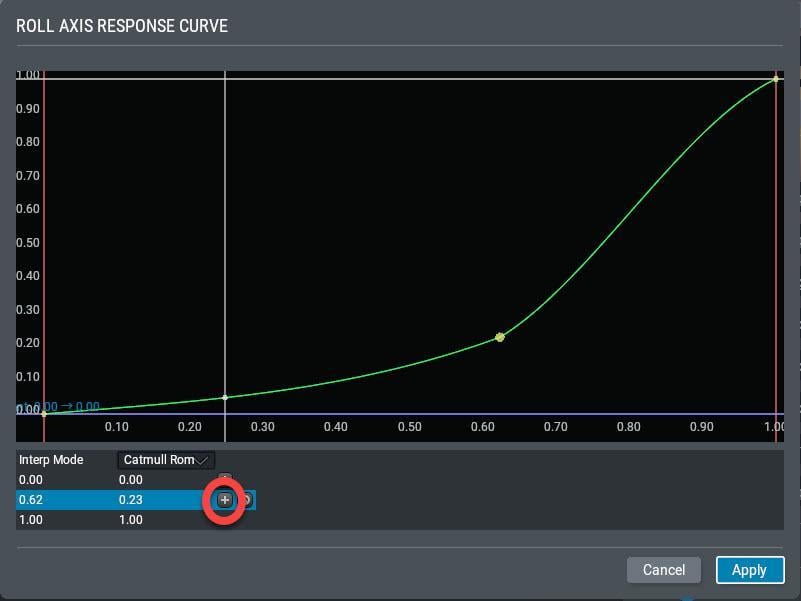
You get this graph by clicking the Add Response Curve button (ringed in the first image). Clicking this button produces this graph:

image.jpeg

There are no instructions in the X-Plane manual how to use this tool and I have to admit I wasted a lot of time trying to get this to work, until finally, I realized that you first have to select a point by clicking on the appropriate row in the table at the bottom. If you want to add another control point you have to click the “+” icon and another line is added. 

After you have figured this out, it’s easy but time-consuming to get the control points into their best position through trial and error.

Two Tips:

  • Don’t add more than two or three control points to the existing three. The fewer the control points, the easier it is to get the curve’s shape to match the characteristics of your peripheral.
     
  • It’s often a good idea to use an external view to see the actual physical movement of the control surfaces. You obviously can’t do this in real-time while you are updating the response curve, but you can quickly see the effect of your tweak while physically looking at the control surface from close-up. It’s then quick and painless to go back and forth into the settings menu from the top menu:image.jpeg

Posted on

Record your Framerate

It’s all very well to to watch “f-act” in the screen frame-rate display as you fly. However it’s constantly changing. The best way to study your frame rate is to have a list of all these figures and maybe put them into a spreadsheet. You can easily do this by clicking on the Developer menu pull-down option and click on Show FPS Test recorder.

Test recorder.jpg

In the window that pops up you can click “Start recording” at any point during your flight and when you have recorded enough, click Stop recording. X-Plane then writes out a file showing the stats:

Test recorder result.jpg

You can find this file in the …X-Plane 12\Output\replays folder as a .fps file. Although it has a .fps extension, its a text file readable in any text editor. It’s laid out as a CSV file [comma-separated values file]  with spaces instead of commas so it’s easy to import into a spreadsheet.

Of course, you can always set the data output to record to a file as well as show on the screen, but this is often overkill since the entire flight’s frame rate is recorded resulting in an enormous file:

Sisk recording.jpg
Posted on

Data Output is not only for Frame Rate monitoring

Judging from the images published on various forums displaying X-Plane screenshots, it seems that most X-Plane users click the checkbox opposite Frame Rate in the Data Output tab in SETTINGS, a frame-rate display appears, and because it is fairly unobtrusive they seem to forget about adding any other monitoring readout. It is a very good idea to periodically look through the list of items that are checked – particularly as you learn more and more about X-plane – and re-assess what should be displayed.
For example, an old joystick or yoke can drift out of calibration more often than you might realize. If you add a check in the box next to Joystick aileron/elevator/rudder (Index #8), a glance at it while flying will re-assure you that your main flying controls are working to the full extents and not require re-calibration.
Spend some time browsing the list of what can be displayed in flight – you may well be pleasantly surprised.

Posted on

Start X-Plane a little faster

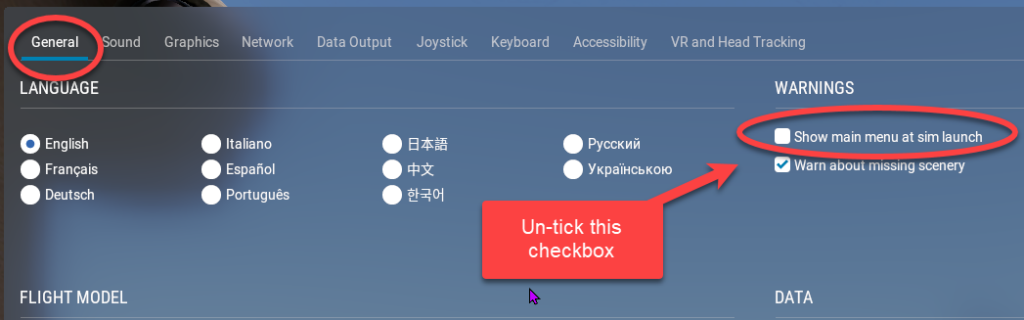
When you simply want to quickly get going again where you left off, there is an option on the Settings –> General page, strangely located under the WARNINGS section, to un-tick the “Show main menu at sim launch” checkbox. This completely bypasses the main menu and automatically launches X-Plane with the RESUME LAST FLIGHT option.

To get the main menu to show again, simply click the drop-down settings icon in the top right corner of the X-Plane Screen:

Posted on

Increase the throttle but the aircraft won’t move

I came across this problem with a new X-Plane install.

The Scenario:

A virginal installation. Joysticks calibrated.

  1. First flight in the default Cessna C172.
  2. Release handbrake,
  3. Add 70% throttle.
  4. Prop spins up.
  5. Audio changes to take off growl. 

The Problem:

The aircraft does not move. 

 Unsuccessful fix attempts:

  • Press image.gif once. Nope. Press the key again. No change.
  • Check if any command with the word “brake” in it is associated with any hardware switch
  • Click the handbrake image to release it. No change.
  • Restart flight. Same story – aircraft won’t move

The solution:

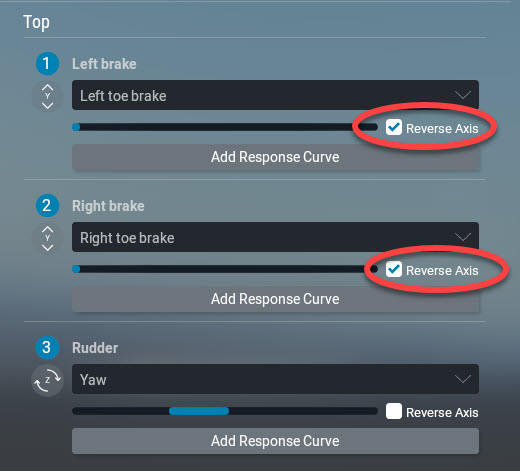
Sometimes the pedals axes are reversed in a new installation.

Go to the Option: Settings –> joystick –> pedals device and Click the “Reverse  Axis” checkbox for each pedal .

Check out this tip containing 7 tips about a stubborn stuck handbrake

Posted on

True Airspeed and Groundspeed Indicator

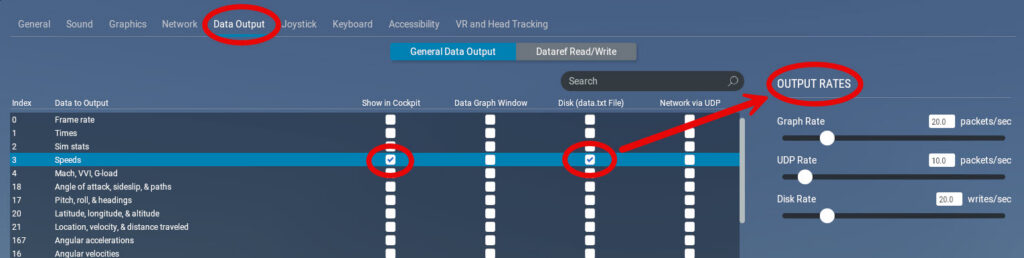
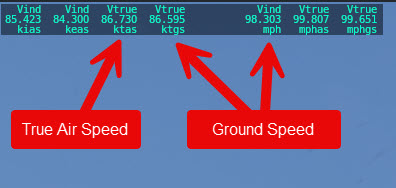
Did you know that hidden in the Speeds option of the data display, you get a table which not only shows your IAS [Indicated Air Speed] and TAS [True Air Speed], but also shows a GS [Ground Speed] indicator as well. Both in knots and mph.

In the Settings –> Data Output screen, you can also click the Disk (data.txt file) checkbox and a series of speeds gets written to a txt file. You can even set the time increment between each recorded data point.

Here’s a link to a useful Wikipedia article explaining what airspeed actually is: