Posted on

The best way to diagnose X-Plane problems – particularly calibration issues is to look at the datarefs.
There are two ways to do this – Using the built-in dataref display or using a freeware plugin called DataRefTool

For example, we often need to check the actions of the parking brake:

You can set a dataref display to show in the screen by clicking Settings –> Data Output and selecting Gear and Brakes:

image.jpeg

The display will look like this:

image.jpeg

Alternatively, use the Dataref plugin which shows more information and is much easier to read:

image.jpeg

To get the Dataref tool go to the DataRefTool web site and download it. The documentation is on the site. This tool is particularly useful for seeing how often the dataref changes by colour-coding the display.

The Dataref tool was created by Lee C Baker is works with X-Plane 11 and X-Plane 12

Once you have finished tinkering, make sure to completely disable the dataref tool plugin before actually flying.

Posted on

Disabling Plugins

When ever X-plane starts running slowly/stutters/jerks or generally misbehaves, the first thing to do is to disable any unused/outdated plugins.
There are two ways to do this:

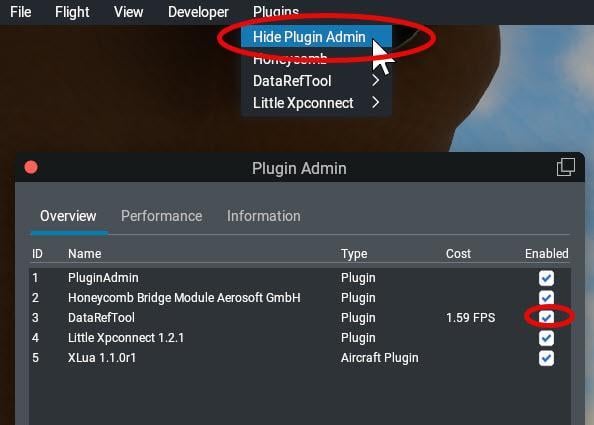
The first method is to go to the Plugins pull-down menu, and click the “Show Plugin Admin” option. This brings up a list of installed plugins and gives you an idea of how many resources they are consuming.

Disable plugin.jpg

Click the “Enabled” checkbox to enable or disable that plugin.

The second method is to completely remove all traces of that plugin by deleting the folder containing the plugin (individual plugin folders are found in the …X-Plane 12/Resources/plugins folder). If you don’t want to delete the plugin because you may want to activate it again, simply move the plugin’s folder to a location outside of the X-Plane 12 folder (like, for example, to the desktop).

Sometimes simply disabling the plugin using the Plugin Admin window is not enough as it still leaves the plugin in the plugin folder and – depending how the plugin is written – this may still have some residual effect. So to be sure that the plugin has no effect, delete or move it. To ensure that the plugin does not start gain the next time X-Plane is started, it needs to be deleted or moved out of the plugins folder.

Note: X-Plane does not use the Windows registry so simply moving the plugin elsewhere outside the X-Plane 12 hierarchy of folders without deleting it will remove its effect entirely.

See also What to do if X-Plane constantly crashes

Posted on

Choosing a CPU, Motherboard, Graphics Card, RAM, SSD and PSU

There are many threads on this forum about “what should I buy?”. Getting the best hardware for a specific budget needs some time spent on it.
You can’t get away from the technical jargon, so learn a little about how they all work together
Here’s a suggested purchase decision flow for a Windows or Linux PC :

  1. Decide on your budget and how flexible it is- for example $XXXX +/- $XXX
  2. Choose the CPU you want. You may have heard of a particular “good” CPU, or you came across a special offer or you went to Passmark Single-thread CPU Benchmark. This site will list CPUs in order of single-thread performance against price. This is constantly updated will get you close to the CPU you are looking for and can afford.
  3. The next decision is the motherboard – Nearly all motherboards work well but stick to brand names like ASUS, Gigabyte, MSI or ASRock. Within each brand they will have a 4 price levels – Budget (uses a budget chipset), Mid-range (uses a budget or mid-range chipset), High-end (uses an top-level chipset with overclocking abilities and higher speed RAM Modules) and Luxury (uses a High-end chipset with extensive overclocking abilities). Unless you are into overclocking, choose a mid-range motherboard with mid-range chipset. If the higher-end motherboard emphasizes good motherboard cooling in their advertising opt for that even if you don’t intend to overclock.
    Once you have chosen your motherboard, google motherboard reviews of that particular motherboard and make sure that your motherboard choice is the best. If you can’t decide which motherboard, ask your AI of choice to compare the motherboards in question specifically asking it to consider X-Plane as the application that will be running on it.
  4. Next is the RAM – This is where most people go wrong. Once you have chosen your motherboard, go to the support section and you will find a compatible memory module list. Only choose a RAM module listed there. If you want to use a different RAM module and it’s not listed, then Stop and re-choose the motherboard. NEVER USE A RAM MODULE THAT IS NOT LISTED!
    Faster RAM is more expensive and there will be diminishing returns the faster it is rated.
  5. Next choose your SSD. Some people prefer the operating system on one SSD and X-Plane on a second SSD, but this is a legacy from the mechanical hard drive days. Now it can happily be just one SSD – Just get the fastest one you can afford – 1TB at minimum – preferably larger. Again, check out reviews of that particular SSD. 
  6. Now study up as much as possible and choose the most powerful graphics card you can afford. X-Plane is evolving to utilize more and more graphics power. For a tight budget, try to choose a Graphics card which is a good balance between The Single-core CPU performance on the one side vs the graphics card and the monitor(s) pixel size. Use ChatGPT to help you find the right Graphics card for a balanced system. The best X-Plane system will usually have the best graphics card but you will be bankrupted in the process. However a graphics card with less than 8GB of RAM will give you endless problems with X-Plane. So once again it is a compromise.
  7. Next choose your PSU [power supply unit]. Again, many people go wrong here. Use an online PSU calculator – Here’s a good calculator from MSI – which will help you calculate the power you need. Now, here’s where people go wrong: if you are on a tight budget add at least 33% to that calculated wattage value, Otherwise add 50%. In other words, if the calculator says you need 650W, purchase a 1000W unit.
    An alternative approach is to use a 2000VA UPS between the Electricity mains and the PC. Then you can stay closer to the calculated wattage.
  8. Finally choose your Chassis and Cooling system. Get a really good CPU water cooler (expensive) because if the CPU runs a bit hot, you will get stutters during flight. Alternatively, modern air coolers are also OK as long as they are really large. Get a large chassis and fit as many additional fans in it as the case will take and make sure the case is broad enough to accommodate a large graphics card and the CPU fan.
  9. Build the system yourself or give your component list to a computer supplier to assemble and test for you. If the computer supplier makes suggestions to your list go back and check first. A computer for X-Plane is not the same as a high-power gaming machine.
Posted on

Why does X-Plane do strange things? Understand and get proper control

If X-Plane seems to act in an unpredictable way, here is possibly (IMHO) the best video that Austin has ever produced. It’s quite old but still completely valid.
It’s a brilliant explanation for why single-engined aircraft veer to the left, or why flaps have non-intuitive side-effects. He also deals with joystick sensitivity issues.

The video is definitely worth a refresh-look. Click here.

Posted on

“Re-install” does not mean “over-write”

After tinkering with your X-Plane or accidentally copying something to the wrong place or inadvertently deleting that vital file, you decide to re-install a fresh copy “from scratch”. Once you have made this decision, be aware that while the installer will scan an existing installation for missing /corrupted files and replace them, it will not delete files/folders that have been moved to the wrong place or stuff which has been added. 

Virginal install.jpg


For the same reason, you don’t want to install a Second copy into the same folder as your existing installation

To get a proper clean install, the new instance of X-Plane needs to be installed into a new folder.

To avoid confusion seasoned X-Plane users tend to prefer to keep the same base folder name. For example “C:\X-plane 12”. So, for a new fresh installation, first rename your existing installation base folder name to something else – for example  rename “C:\X-plane 12” to “C:\X-plane 12-OLD”. Then download and re-install the new fresh virginal copy to “C:\X-plane 12”.

Virginal install-2.jpg

TIP:
Since downloads take a while, immediately COPY this installation to another folder  like “C:\X-plane 12-VIRGINAL” which you never access. That way, you have a clean untouched copy.  At a later stage you can delete the “OLD” folder

Posted on

Record your Framerate

It’s all very well to to watch “f-act” in the screen frame-rate display as you fly. However it’s constantly changing. The best way to study your frame rate is to have a list of all these figures and maybe put them into a spreadsheet. You can easily do this by clicking on the Developer menu pull-down option and click on Show FPS Test recorder.

Test recorder.jpg

In the window that pops up you can click “Start recording” at any point during your flight and when you have recorded enough, click Stop recording. X-Plane then writes out a file showing the stats:

Test recorder result.jpg

You can find this file in the …X-Plane 12\Output\replays folder as a .fps file. Although it has a .fps extension, its a text file readable in any text editor. It’s laid out as a CSV file [comma-separated values file]  with spaces instead of commas so it’s easy to import into a spreadsheet.

Of course, you can always set the data output to record to a file as well as show on the screen, but this is often overkill since the entire flight’s frame rate is recorded resulting in an enormous file:

Sisk recording.jpg
Posted on

Check the fuel when restoring a flight

Whenever you reload a saved flight or resume the last flight, always check the fuel quantity that has been loaded.
For example if you make a flight with the default Laminar B737 and save the flight, when you reload the saved flight again, X-Plane 12 seems to reset the fuel to a default amount and does not save the actual fuel remaining when you saved the flight.

This is not consistent between the default aircraft, so always as a matter of proper planning, check the fuel load as part of the pre-fight preparations – don’t assume that the fuel loaded between flights will remain the same even if you did not even start the engines.

Posted on

What to do if X-Plane constantly crashes.

I think these “commandments” should be permanently engraved for posterity.

Here are the verbatim instructions from @Janov on the X-Plane.org forum who has been forced to produce countless variations every few weeks or so.

On 6/28/2025 at 6:28 AM, Janov said:

This is a guideline on how to cure your X-Plane problems of crashing or device loss errors (DLE):

1.) Make sure your operating system is in prime shape. No overclocking. Latest drivers. Default graphic settings (no esoteric Nvidia settings, etc.), no paranoid anti-virus, no “I got this on a cool reddit forum with Windows tips” stuff.

2.) Remove all third party content from your X-Plane installation. Physically move them somewhere else, disabling them in X-Plane is not enough. This includes plugins, aircraft, scenery. If you are not sure you can do this reliably, just delete everything and install X-Plane fresh.

3.) Fly a default aircraft for a very long time. Let it go on autopilot if you don`t have the time, but fly a default aircraft in a default (“vanilla”) simulator setup until it crashes or you are sure that it is stable. The longer the better, I personally recommend to use it in this state for several long flights until you declare it stable.

4.) If the simulator crashed or you suffer a device loss error, file a bug with Laminar Research (google X-Plane bug reporter). Wait for LR to fix the problem. You can now post here and let us know about your problem, maybe someone can spot something wrong with your system that you missed.

5.) If you completed the long testing run with no problem, you can install your FIRST add-on. ONLY ONE! Repeat the long duration testing run. If XP crashes or has a DLE, you have found the offending third-party item. Do not use it anymore. Contact the developer of said item to fix it.

6.) Add your NEXT add-on. Repeat testing, discarding all add-ons that cause crashes or DLE´s.

Remember, there are no “must have” add-ons. There are only compatible or incompatible add-ons. It is the developer´s responsibility to make his add-on compatible or take it up with LR if the problem is not on his side.

Posted on

Data Output is not only for Frame Rate monitoring

Judging from the images published on various forums displaying X-Plane screenshots, it seems that most X-Plane users click the checkbox opposite Frame Rate in the Data Output tab in SETTINGS, a frame-rate display appears, and because it is fairly unobtrusive they seem to forget about adding any other monitoring readout. It is a very good idea to periodically look through the list of items that are checked – particularly as you learn more and more about X-plane – and re-assess what should be displayed.
For example, an old joystick or yoke can drift out of calibration more often than you might realize. If you add a check in the box next to Joystick aileron/elevator/rudder (Index #8), a glance at it while flying will re-assure you that your main flying controls are working to the full extents and not require re-calibration.
Spend some time browsing the list of what can be displayed in flight – you may well be pleasantly surprised.

Posted on

An Easy View of Historical Frame Rates

Here is a quick and easy way to see all the frame rates (or whatever data you are interested in) over a specified period of time.
In the Settings –> Data Output tab, click the check box in the Data Graph Window column: Data Graph window settings.jpg

Now begin your flight.
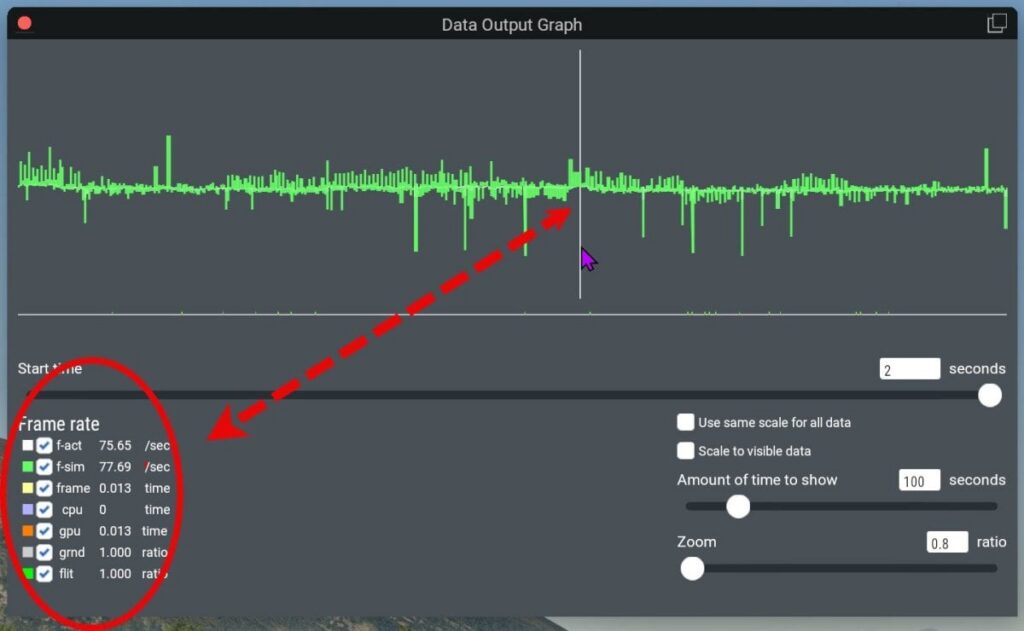
When you want to see the data, type [CTRL] G on Windows and Linux and [CMD] G on a Mac and a Data Output Graph window appears:

In this window you can adjust the time taken for the graph to travel from one side to the other side of the window. Now move the cursor above the green graph and a vertical white line appears at the cursor position and the precise frame rate (and related times) appears in the Frame rate list on the left. Once the graph reaches the right hand side of the screen (the specified “Amount of time to show”), The graph simply scrolls. Pressing pause [P] stops the simulation and the graph and will allow you to read the exact data value that appears below the vertical white line.
An added bonus is that the window can be moved to a second monitor where the graph can be enlarged and can be displayed while you fly without obscuring the main flying monitor.