Posted on

Nvidia Drivers – update or not?

The latest NVIDIA driver is not necessarily the best. Be cautious about updating it as soon as it is released. 
A better approach is to download a driver and keep the .zip archive file after installation. If you update the driver and X-Plane behaves worse, you can always revert to the older (better) driver.

Look at the specific improvements NVIDIA announces – I have never seen X-Plane specifically mentioned in any of their gaming improvement lists – but that doesn’t mean the new driver might not improve X-Plane’s performance on your machine.

Posted on

CPU or GPU – Identifying the Hardware Bottleneck

Before setting up your X-Plane hardware for maximum performance, you want to ascertain whether the CPU and the GPU are roughly in balance. This will warn you whether you seriously need to consider upgrading to a better CPU or a better GPU before you go to all the trouble of running further tests and setting your whole system up carefully.

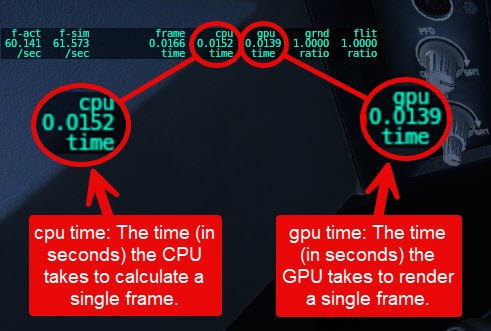
In the X-Plane’s settings screen, click on the Data Output tab. Tick the Frame rate checkbox. Start X-Plane

CPU Time Vs GPU Time.jpg

With X-Plane running, compare the time the CPU takes to calculate a frame with the time the GPU takes to render that frame. Ideally, with perfectly balanced hardware, the two numbers should be identical but in actual practice, as you move the view, the two numbers will change. They will also change if you change the graphics settings. The main point here, however, is that if the numbers are reasonably similar, then your hardware is balanced. If one or the other is very much larger, it’s an indication the one is being maxed out while the other is just coasting along. Also if one value is constant while the other fluctuates with different views, then you know that either the GPU or the CPU is saturated and can’t keep up with the other.

For more information on this subject @Janov wrote an excellent post about this bottleneck on X-Plane.org

on X-Plane.org

Posted on

Add-on Aircraft doesn’t work properly

Troubleshooting tip – may or may not help:

Sometimes, a 3rd-party add-on aircraft just does not seem to work properly or initialize correctly.

A workaround is first to load up the Default Cessna 172, then, once it is loaded, from the pull-down menu, click Flight –> Flight Configuration and change your aircraft to your 3rd-party aircraft.

Reason this sometimes works:

Sometimes X-Plane needs to be initialized with a default aircraft first. This is an old tip, but it sometimes applies even with X-Plane 12 – compatible add-on aircraft or mods.

Posted on

Calibrating Joysticks doesn’t seem to work properly?

Most times, just calibrating your Joystick from the Settings –> Joystick menu in X-Plane works just fine.

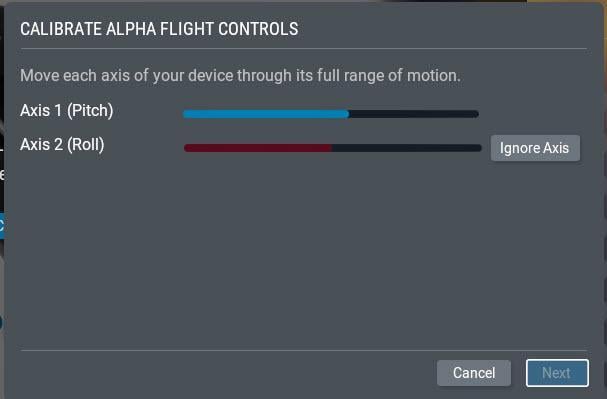
All you need to do is move the controls to their extents, and the ribbon turns blue. Then you click Next, and so on…

But sometimes, the ribbon stubbornly refuses to change to blue or turns blue before you have moved the axes to their full extent.

So what do you do? 

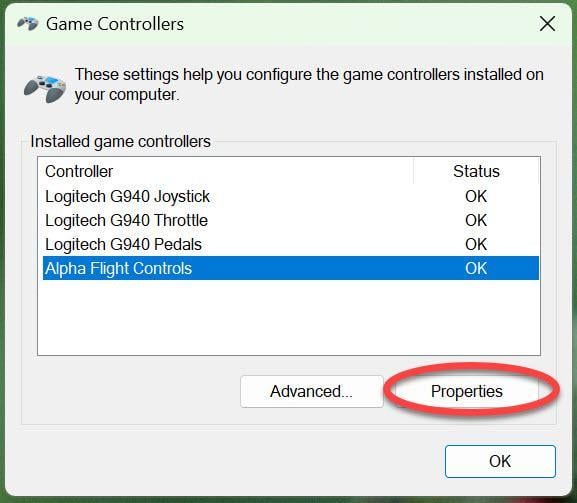
You first calibrate the joystick(s) in Windows first.

Type USB into the Windows search box and click image.jpeg

Then select the offending peripheral and click Properties:

image.jpeg

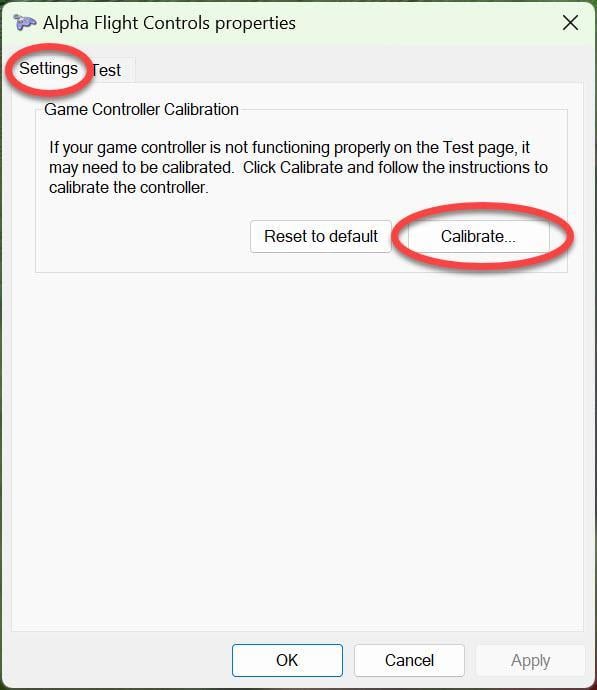
Then click the Settings tab and the Calibrate button:

image.jpeg

and go through the calibrate routine.

Then start X-Plane and at the main menu click the Settings option, and then select the Joystick  pull-down menu, select your peripheral :

image.jpeg

Click Calibrate and go through the standard X-Plane calibration routine:

image.jpeg
Posted on

A Mysterious White Square with a Cross

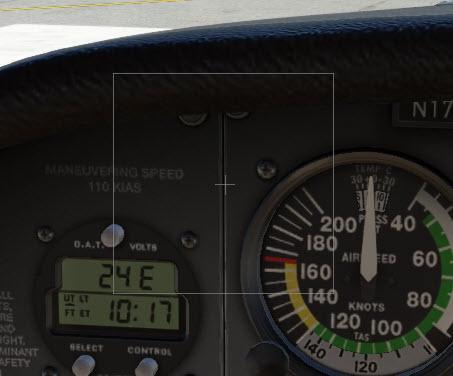
Ever seen this?

image.jpeg

Sometimes a strange white box appears with a cross in the middle. This is actually a mini-control panel for controlling X-Plane with a mouse. It pops up when your joystick/yoke is either missing or faulty.

Dragging the cross with the mouse operates the turn and pitch controls.

The square disappears when you connect a Joystick or Yoke, even when X-Plane is running.

If it appears sporadically, it’s usually a sign of a break in the mouse USB cable or plug.

Posted on

Verifying Calibration

Once you have calibrated your peripherals, first in Windows, then in X-Plane, you want to check that they are functioning correctly. The obvious way is to start X-Plane and move the controls. But a more precise way is to check the Data Output values.

Go to SETTINGS –> Data Output

Click the first checkbox next to option 8, the actual values that the joystick/yoke passes to X-Plane are then displayed in the upper left corner of the screen:

Click the first checkbox next to option 26, the actual values that the throttle passes to X-Plane are then displayed in the upper left corner of the screen:

image.jpeg

Now move the peripheral to its extents and observe the displayed numbers between 0.000 (minimum) and 1.000 (maximum).

If you cannot attain numbers very close to 0.000 (minimum) and 1.000 (maximum), recalibrate again (first Windows calibration then X-Plane calibration)

Once you have verified that the extreme values are OK, then this precise data output also helps you to adjust the sensitivity curve more precisely than just eyeballing the graph.

See also: Control Sensitivity Vs Axis Response Curves

Posted on

USB-2 vs USB-3…

This tip is undoubtedly well known to X-Plane users who upgraded their computer hardware fifteen years ago, but perhaps it is not so well known today.

While USB-3 ports are supposed to be totally backwards compatible, in practice, this is not always so. 

If you have an older USB joystick, set of pedals, or other peripheral device that was originally built to use a USB 2 port, avoid plugging it into a USB-3 (blue or red) port unless you have no option. Instead, for best reliability, plug it into a USB-2 (black) port if there is one at the rear of the motherboard.

This tip is particularly important if you use several USB-2 devices (like the older Saitek Radio and instrument panels) connected to a USB hub. Make sure that the hub is designed for USB-2 devices and plugs into a USB-2 port.

Posted on

Lost ATC window

Sometimes when the ENTER key is pressed to bring up the ATC window, it does not appear. It seems to be off screen. This frequently happens after a multi-monitor reconfiguration, resolution change, or display layout tweak.
The easiest way to force it back to the primary display is to clear or reset the stored window position preferences.
X-Plane saves dialog and popup coordinates in specific preference files. Deleting or renaming them forces X-Plane to recreate them with default, on-screen coordinates without wiping out your aircraft or controller profiles.

Quit X-Plane 12 completely.

Open File Explorer and navigate to your X-Plane 12 folder. (For example : C:\X-Plane 12)

Click the Output sub-folder, then open preferences (…\X-Plane 12\Output\preferences). Locate the following files (you’ll see one or both):

X-Plane Window Positions.prf
X-Plane Screen Res.prf

Rename them to

X-Plane Window Positions.prf.bak
X-Plane Screen Res.prf.bak

or simply move them to your desktop as a backup.

Restart X-Plane 12 and fresh preference files will be generated, pulling the ATC window to it’s default default position on the main screen.

Posted on

Control Sensitivity Vs Axis Response Curves

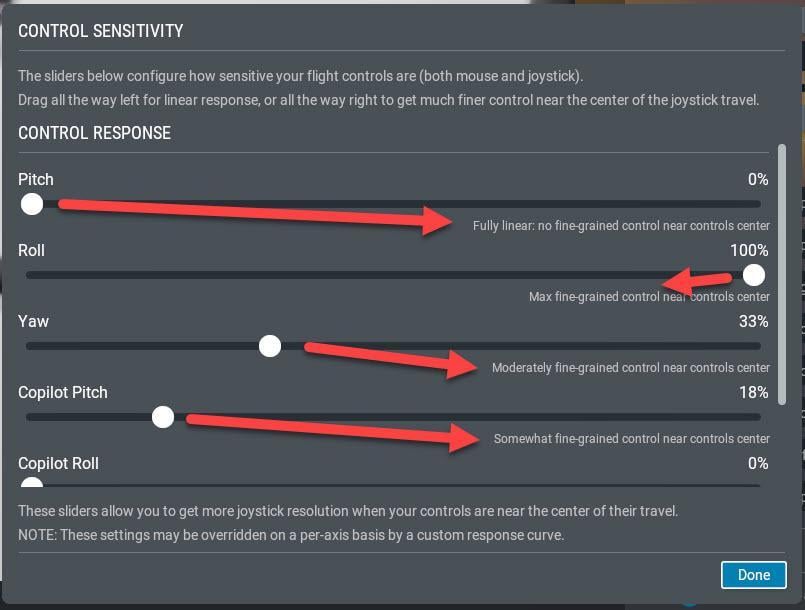
To adjust the sensitivity of a Joystick/Yoke, you use the CONTROL RESPONSE panel of sliders:

image.jpeg

This allows you to set an overall sensitivity for the pilot’s Pitch, Yaw and Roll axis as well as the Copilot’s Pitch, Yaw and Roll axis:

image.jpeg

The panel tells you the effect of moving the slider.

HOWEVER…

This is just a linear setting, and therefore, it is only of real use if your Yoke/Joystick is absolutely linear in performance. Very few are unless they are brand new with no wear and of very good quality.

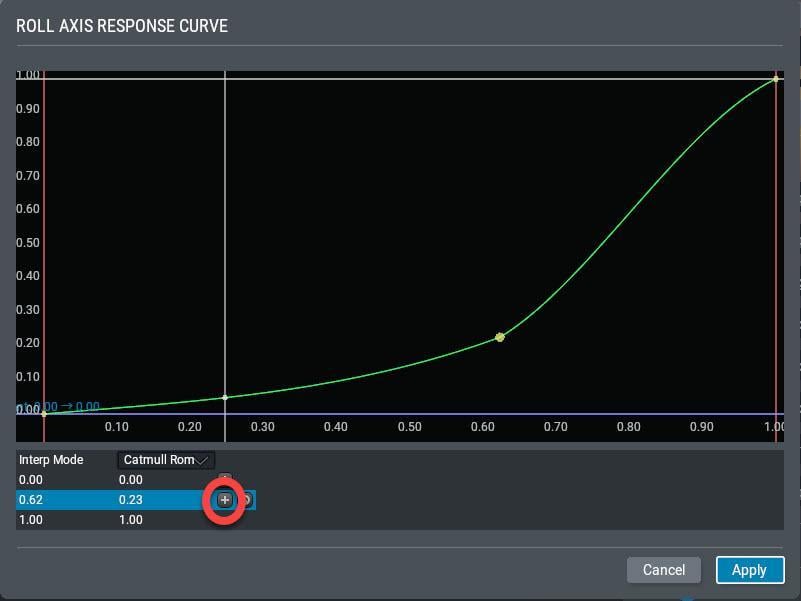
A more useful tool is the response curve graph. But unfortunately, you cannot use the SENSITIVITY tool for rough adjustments and then fine-tune it with the RESPONSE CURVE. In X-Plane 12, it’s Either/Or. 

You get this graph by clicking the Add Response Curve button (ringed in the first image). Clicking this button produces this graph:

image.jpeg

There are no instructions in the X-Plane manual how to use this tool and I have to admit I wasted a lot of time trying to get this to work, until finally, I realized that you first have to select a point by clicking on the appropriate row in the table at the bottom. If you want to add another control point you have to click the “+” icon and another line is added. 

After you have figured this out, it’s easy but time-consuming to get the control points into their best position through trial and error.

Two Tips:

  • Don’t add more than two or three control points to the existing three. The fewer the control points, the easier it is to get the curve’s shape to match the characteristics of your peripheral.
     
  • It’s often a good idea to use an external view to see the actual physical movement of the control surfaces. You obviously can’t do this in real-time while you are updating the response curve, but you can quickly see the effect of your tweak while physically looking at the control surface from close-up. It’s then quick and painless to go back and forth into the settings menu from the top menu:image.jpeg

Posted on

The “misbehaving” Right-Drag button

To right-drag in the X-Plane view [ Press and hold the right mouse button ][ Move the mouse ] is much more convenient than using the keyboard or the HAT switch on a controller.

However, be aware of two quirks. If you have a sensitive right mouse button you may find yourself locked into a continuous panning effect even when the button is released and you merely move the mouse.
This is caused by a double-right-click. This is great if you want the constant panning effect, but disturbing if it is unexpected. To cancel this constant panning, make a single right-click. (Left clicking has no effect).

The other effect occurs when you start a right-drag with the cursor touching the left or right edge of the monitor. You will find that you can pan away from that side but if you pan back you can pan only as far as that edge, whereupon the panning refuses to pan further in that direction. The solution, of course, is to start a right-drag with the cursor anywhere except flush up to a side edge. Then your panning is unrestricted.